> ## Documentation Index
> Fetch the complete documentation index at: https://onetest.ai/llms.txt
> Use this file to discover all available pages before exploring further.
# Quick Start Guide
> Get up and running with OneTest in under 5 minutes
Get up and running with OneTest in under 5 minutes. This guide will walk you through creating your first test, running it, and viewing results.
## Prerequisites
Before you begin, make sure you have:
A OneTest account ([Sign up here](https://tms.onetest.ai))
Access to the OneTest web application
Basic understanding of software testing concepts
If you're new to testing, check out [What is OneTest?](/getting-started/what-is-onetest) first for a gentle introduction.
## Step 1: Create Your First Product
A **product** is a workspace that contains all your tests, test runs, and settings.
Click **"+ New Product"** in the top navigation
Enter the following information:
* **Name:** `My First App`
* **Description:** `Testing my web application`
* **Type:** `Web Application`
Click **"Create Product"**
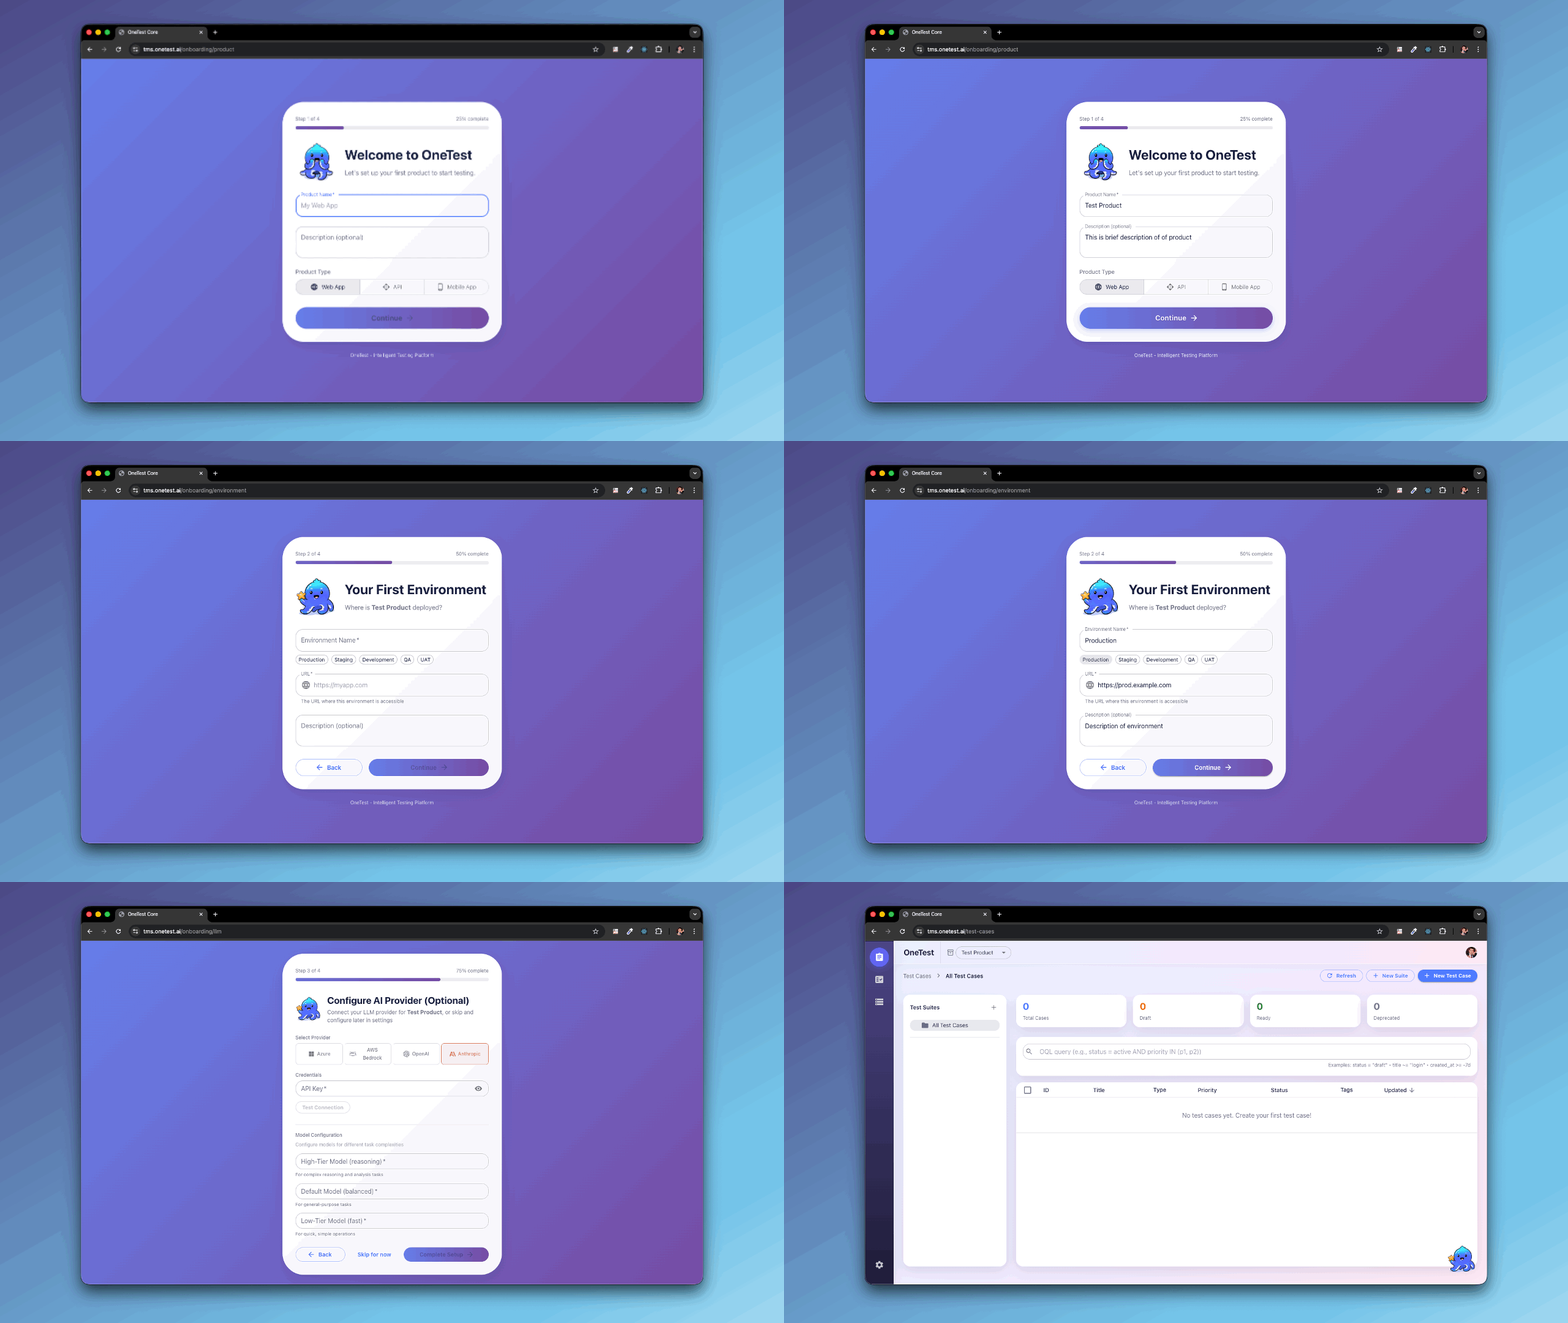 You can create multiple products for different applications or teams.
## Step 2: Create Your First Test Case
Now let's create a simple test case. We'll use the AI Assistant to make it quick!
Press `Cmd/Ctrl + K` to open the chat
Type:
```
Create a test for login with valid credentials
```
Watch the AI create your test automatically
Click **"Save"** when you're happy with it
**Example AI Output:**
```markdown theme={null}
✅ Created TC-0001: Verify successful login with valid credentials
Title: Verify successful login with valid credentials
Type: Manual
Priority: P2
Tags: smoke, login, authentication
Preconditions:
- User has a valid account
- User is not already logged in
Test Steps:
1. Navigate to the login page
Expected: Login form is displayed with username and password fields
2. Enter valid username: test@example.com
Expected: Username field accepts the input
3. Enter valid password
Expected: Password is masked with dots (••••)
4. Click the "Login" button
Expected: User is redirected to the dashboard within 2 seconds
5. Verify user name is displayed in the header
Expected: Header shows "Welcome, Test User"
Pass Criteria:
- User successfully logs in without errors
- Dashboard loads within 2 seconds
- User session is created
```
AI-generated tests are usually more detailed and follow best practices automatically!
Go to the **Test Management** page
Click **"+ New Test Case"** button
* **Title:** `Verify successful login with valid credentials`
* **Type:** `Manual`
* **Priority:** `P2`
* **Tags:** Add `smoke` and `login`
For each step:
* Click **"+ Add Step"**
* Enter **Action:** (e.g., `Navigate to login page`)
* Enter **Expected Result:** (e.g., `Login form is displayed`)
Click **"Save Test Case"**
You can create multiple products for different applications or teams.
## Step 2: Create Your First Test Case
Now let's create a simple test case. We'll use the AI Assistant to make it quick!
Press `Cmd/Ctrl + K` to open the chat
Type:
```
Create a test for login with valid credentials
```
Watch the AI create your test automatically
Click **"Save"** when you're happy with it
**Example AI Output:**
```markdown theme={null}
✅ Created TC-0001: Verify successful login with valid credentials
Title: Verify successful login with valid credentials
Type: Manual
Priority: P2
Tags: smoke, login, authentication
Preconditions:
- User has a valid account
- User is not already logged in
Test Steps:
1. Navigate to the login page
Expected: Login form is displayed with username and password fields
2. Enter valid username: test@example.com
Expected: Username field accepts the input
3. Enter valid password
Expected: Password is masked with dots (••••)
4. Click the "Login" button
Expected: User is redirected to the dashboard within 2 seconds
5. Verify user name is displayed in the header
Expected: Header shows "Welcome, Test User"
Pass Criteria:
- User successfully logs in without errors
- Dashboard loads within 2 seconds
- User session is created
```
AI-generated tests are usually more detailed and follow best practices automatically!
Go to the **Test Management** page
Click **"+ New Test Case"** button
* **Title:** `Verify successful login with valid credentials`
* **Type:** `Manual`
* **Priority:** `P2`
* **Tags:** Add `smoke` and `login`
For each step:
* Click **"+ Add Step"**
* Enter **Action:** (e.g., `Navigate to login page`)
* Enter **Expected Result:** (e.g., `Login form is displayed`)
Click **"Save Test Case"**
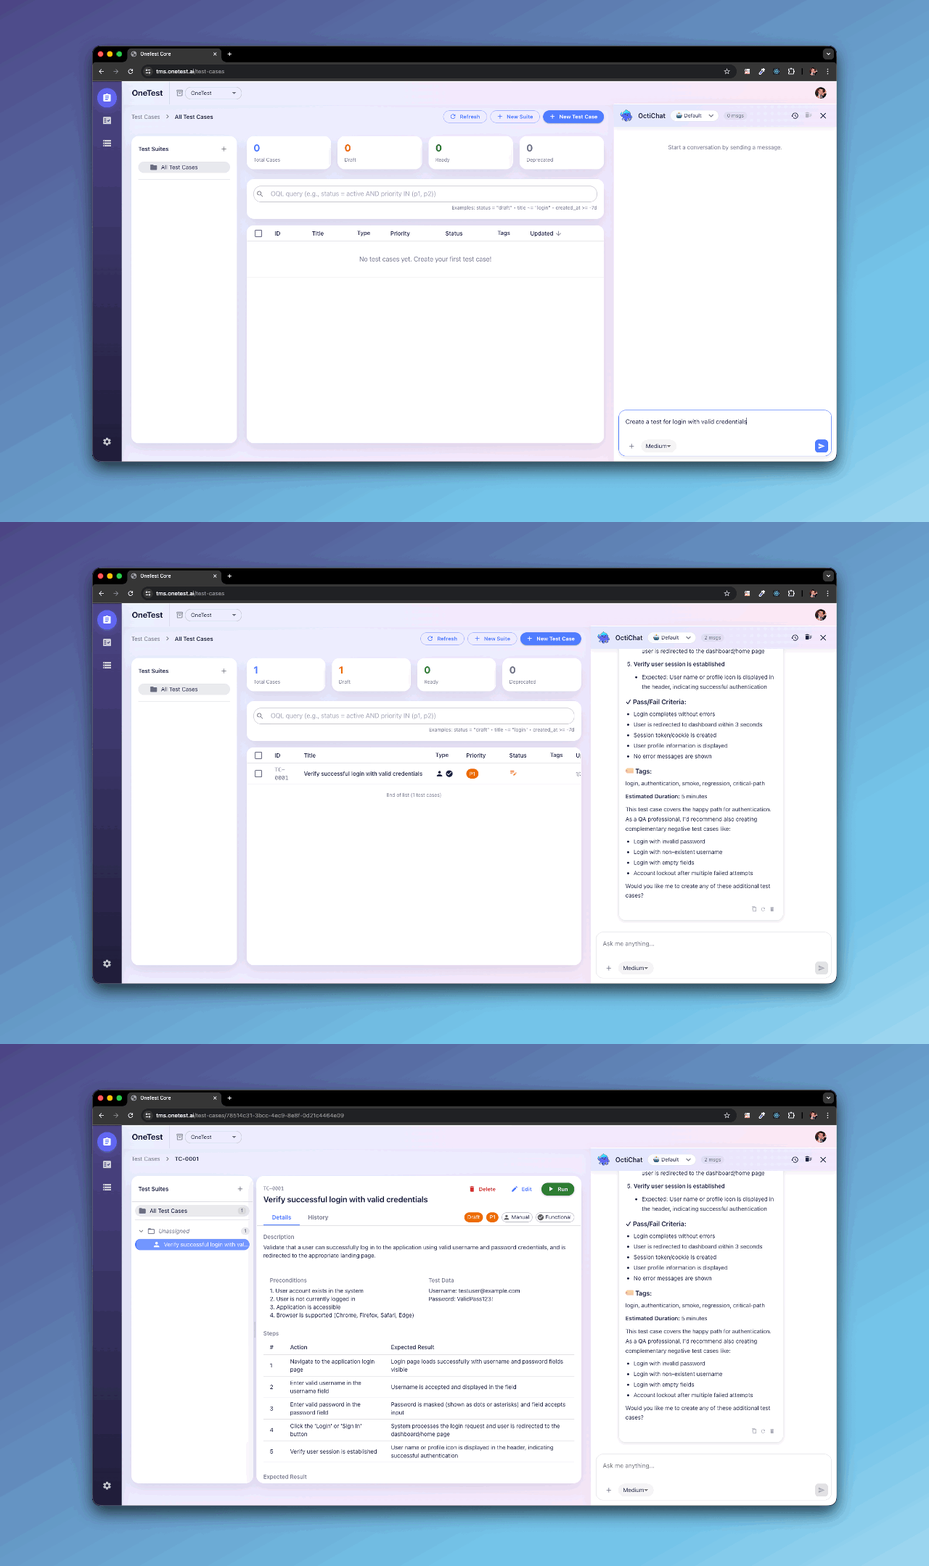 Your test case is automatically assigned a unique identifier (e.g., TC-0001) and is now ready to be executed!
## Step 3: Run Your First Test
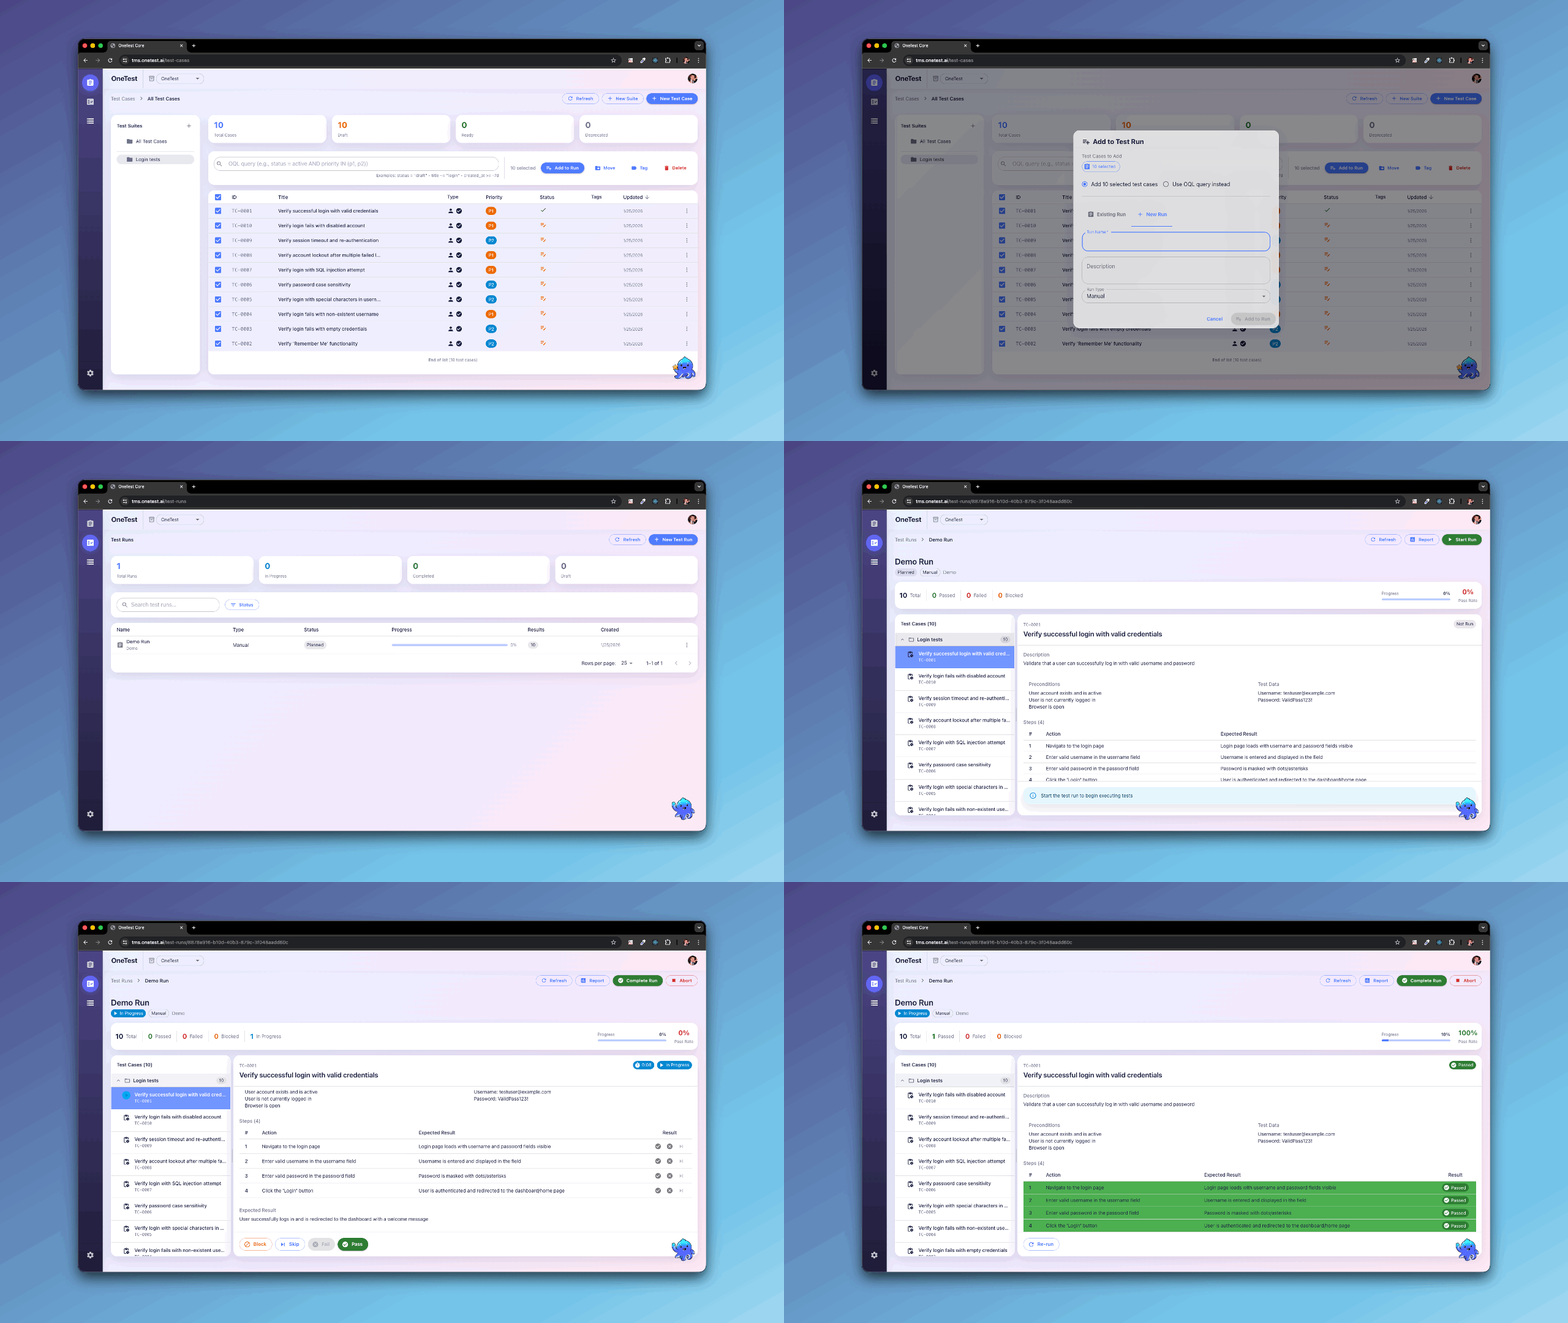
Now let's execute the test case you just created.
Navigate to the **Test Management** page
Locate your test case (TC-0001)
Click the **"▶ Run"** button
In the dialog, enter:
* **Run Name:** `First Test Run - Staging`
* **Environment:** Select `Staging` (or create one)
* **Build:** Select a build or leave empty
Click **"Start Run"**
Your test case is automatically assigned a unique identifier (e.g., TC-0001) and is now ready to be executed!
## Step 3: Run Your First Test
Now let's execute the test case you just created.
Navigate to the **Test Management** page
Locate your test case (TC-0001)
Click the **"▶ Run"** button
In the dialog, enter:
* **Run Name:** `First Test Run - Staging`
* **Environment:** Select `Staging` (or create one)
* **Build:** Select a build or leave empty
Click **"Start Run"**
 ## Step 4: Execute and Record Results
OneTest will take you to the **Test Execution** page where you can record your results as you test.
### Recording Results
For each test step:
1. **Perform the action** (e.g., navigate to login page)
2. **Observe the result**
3. **Click the status:**
* ✅ **Pass** - Everything works as expected
* ❌ **Fail** - Something doesn't match the expected result
* ⏭️ **Skip** - Step wasn't executed
* 🚫 **Blocked** - Can't proceed due to an issue
4. Add notes if needed (especially for failures!)
### Example Execution
```markdown theme={null}
Step 1: Navigate to login page
Status: ✅ Pass
Notes: Login form loaded correctly
Step 2: Enter valid username
Status: ✅ Pass
Step 3: Enter valid password
Status: ✅ Pass
Notes: Password was properly masked
Step 4: Click Login button
Status: ❌ Fail
Notes: Got error "Server timeout" - dashboard didn't load
Step 5: Verify user name
Status: 🚫 Blocked
Notes: Could not complete due to step 4 failure
```
When done, click **"Complete Execution"**.
## Step 5: View Your Results
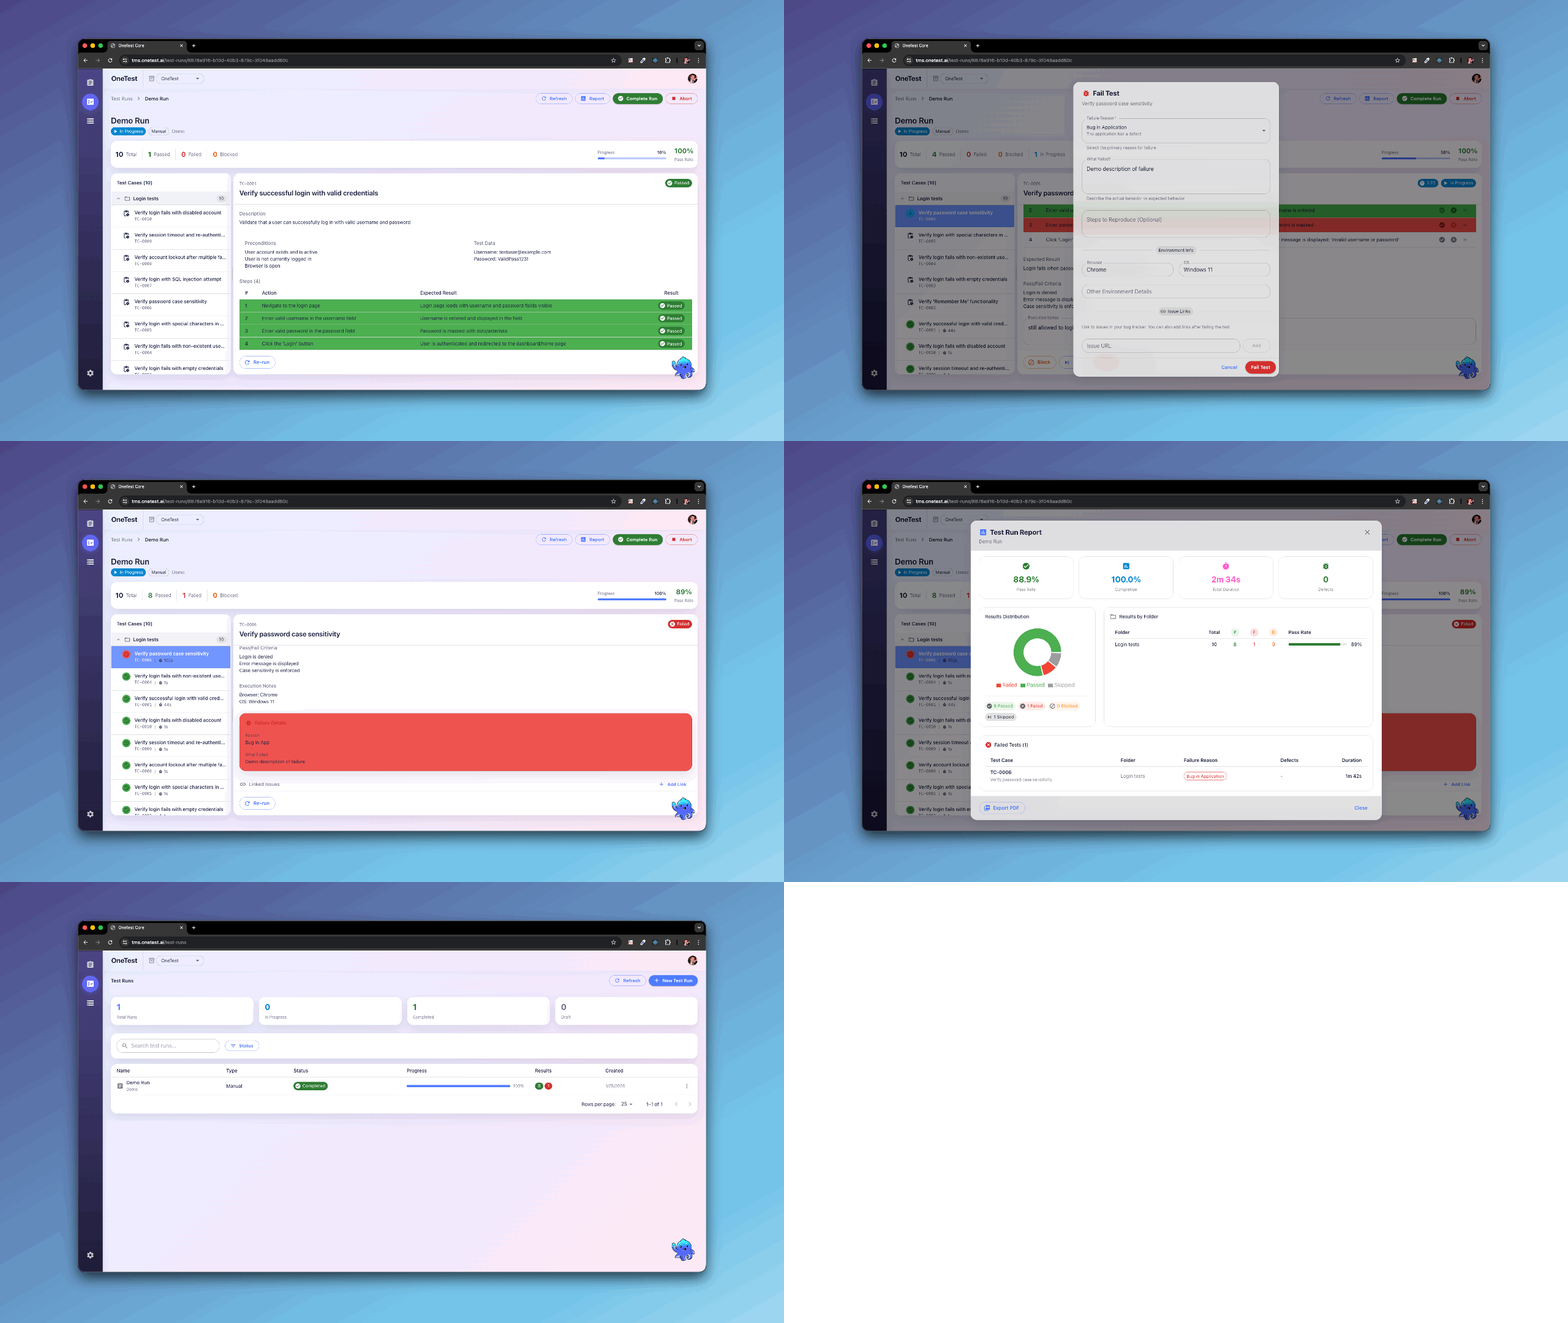
After completing the test run, you'll see a summary:
### Run Summary
| Metric | Value |
| --------------- | --------- |
| **Total Tests** | 1 |
| **Passed** | 0 |
| **Failed** | 1 |
| **Blocked** | 0 |
| **Pass Rate** | 0% |
| **Duration** | 8 minutes |
## Step 4: Execute and Record Results
OneTest will take you to the **Test Execution** page where you can record your results as you test.
### Recording Results
For each test step:
1. **Perform the action** (e.g., navigate to login page)
2. **Observe the result**
3. **Click the status:**
* ✅ **Pass** - Everything works as expected
* ❌ **Fail** - Something doesn't match the expected result
* ⏭️ **Skip** - Step wasn't executed
* 🚫 **Blocked** - Can't proceed due to an issue
4. Add notes if needed (especially for failures!)
### Example Execution
```markdown theme={null}
Step 1: Navigate to login page
Status: ✅ Pass
Notes: Login form loaded correctly
Step 2: Enter valid username
Status: ✅ Pass
Step 3: Enter valid password
Status: ✅ Pass
Notes: Password was properly masked
Step 4: Click Login button
Status: ❌ Fail
Notes: Got error "Server timeout" - dashboard didn't load
Step 5: Verify user name
Status: 🚫 Blocked
Notes: Could not complete due to step 4 failure
```
When done, click **"Complete Execution"**.
## Step 5: View Your Results
After completing the test run, you'll see a summary:
### Run Summary
| Metric | Value |
| --------------- | --------- |
| **Total Tests** | 1 |
| **Passed** | 0 |
| **Failed** | 1 |
| **Blocked** | 0 |
| **Pass Rate** | 0% |
| **Duration** | 8 minutes |
 ### What's Next?
* Continue creating more test cases
* Build a smoke test suite
* Set up automated runs
* Review failure notes
* Report bugs to your team
* Retest after fixes
## Next Steps
Congratulations! You've created and run your first test. Now you can:
Create tests faster with AI assistance
Use folders and tags effectively
Search tests with powerful queries
Configure staging and production
Manage releases and sprints
Collaborate with your team
## Common Questions
Unlimited! Create as many as you need to properly test your application.
Manual tests record human execution. For automation, integrate with tools like Selenium or Playwright (coming soon).
Yes! Use the AI to convert existing test documentation:
```
Create tests from this document: [paste your test doc]
```
Use **folders** for hierarchy and **tags** for cross-cutting concerns:
* Folders: By feature (Login, Checkout, Profile)
* Tags: By type (smoke, regression, api)
[→ Learn more about organizing tests](/workflows/organizing-tests)
## Need Help?
Press `Cmd/Ctrl + K` and ask anything
Join the community discussions
Found a bug? Let us know
Get help from our team
Try generating multiple tests with AI next! 🚀
### What's Next?
* Continue creating more test cases
* Build a smoke test suite
* Set up automated runs
* Review failure notes
* Report bugs to your team
* Retest after fixes
## Next Steps
Congratulations! You've created and run your first test. Now you can:
Create tests faster with AI assistance
Use folders and tags effectively
Search tests with powerful queries
Configure staging and production
Manage releases and sprints
Collaborate with your team
## Common Questions
Unlimited! Create as many as you need to properly test your application.
Manual tests record human execution. For automation, integrate with tools like Selenium or Playwright (coming soon).
Yes! Use the AI to convert existing test documentation:
```
Create tests from this document: [paste your test doc]
```
Use **folders** for hierarchy and **tags** for cross-cutting concerns:
* Folders: By feature (Login, Checkout, Profile)
* Tags: By type (smoke, regression, api)
[→ Learn more about organizing tests](/workflows/organizing-tests)
## Need Help?
Press `Cmd/Ctrl + K` and ask anything
Join the community discussions
Found a bug? Let us know
Get help from our team
Try generating multiple tests with AI next! 🚀